Library Manager: Difference between revisions
m (1 revision) |
No edit summary |
||
| (10 intermediate revisions by 2 users not shown) | |||
| Line 1: | Line 1: | ||
{{ | {{Language}} | ||
{{UpdatedPage|2009-04-01|2.5.2.1|}} | |||
The Shareaza Library Manager is one of the key features of Shareaza. It allows you to organize your library of downloaded and shared files. | |||
The Shareaza Library allows you to | |||
[[Image:library_overview.png]] | == Overview == | ||
[[Image:library_overview.png|right]] | |||
''The Shareaza Library allows you to manage all your files from within Shareaza.'' | |||
'''1 | '''1. Mode switcher:''' The Shareaza Library has two file Browsing modes. Physical (Folders) and Virtual (Organiser). Physical or Folder mode shows your files and folders as they are stored on your harddrive. In Virtual or Organiser mode Shareaza organizes your files based on thier content. No matter where they are stored all your mp3 files will appear in the my Music folder There they are again put into separate folders for the corresponding album or artist or genre. Note that in the Virtual library, the same file may be placed in more than one virtual folder at a time. | ||
'''2 | '''2. Recent Additions:''' Shareaza keeps the files which have been recently downloaded in a Recent additions list. This list is shown here. If you click on one of the links the file will be selcted in your library. You can clear this list using the button on the [[Options.Library|Library Settings window]]. | ||
'''3 | '''3. Main display area:''' In this area you can see the folder content or the album tracks if you selected an album folder. | ||
'''4 | '''4. View changer:''' This button allows you to change the view mode. Available modes are: | ||
* Detail view | * Detail view | ||
* List view | * List view | ||
| Line 19: | Line 21: | ||
* Album View | * Album View | ||
'''5 | '''5. Find files:''' This allows you to search your library for files. It uses the same mechanism for searching as a regular network search. This means that substring searches do only work if the word you are searching for is the word in the file minus the last one or two letters. | ||
'''6 | '''6. Share Files...:''' This button opens the Folder manager dialog which allows you to add or remove folders from your library. The folders in your library are not necessarily shared. They can be unshared using the context menu. | ||
=== Context menu in Organiser mode === | |||
[[Image:library_contextmenu_organizer.png]] | [[Image:library_contextmenu_organizer.png|right]] | ||
'''Play Album''' enqueues all files in the selted album folder in the [[ | '''Play Album''' enqueues all files in the selted album folder in the [[Shareaza Media Player]]. | ||
'''Delete''' removes the selected folder from the Library. This only removes the folder. The files are still there. | '''Delete''' removes the selected folder from the Library. This only removes the folder. The files are still there. | ||
| Line 32: | Line 34: | ||
'''Rebuild''' makes Shareaza re-read the files' metadata and recalculate the hash values. | '''Rebuild''' makes Shareaza re-read the files' metadata and recalculate the hash values. | ||
'''Export Collection...''' creates an XML file which can be used as a basis for a [[ | '''Export Collection...''' creates an XML file which can be used as a basis for a [[Collection|Shareaza collection file]]. | ||
'''New Folder...''' creates a new album folder. This is not a fodler on your harddrive. It only exists in the Shareaza Library and allows you to better organize your files. | '''New Folder...''' creates a new album folder. This is not a fodler on your harddrive. It only exists in the Shareaza Library and allows you to better organize your files. | ||
| Line 40: | Line 42: | ||
'''Album Poperties''' Opens the album properties dialog which allows you to set the album type and apply metadata to all files in the selected folder. Applying metadata doesn't change the file. Metadata is stored in an XML file which resides in the Metadata folder, which exists in every Folder that has been added to the Shareaza library. | '''Album Poperties''' Opens the album properties dialog which allows you to set the album type and apply metadata to all files in the selected folder. Applying metadata doesn't change the file. Metadata is stored in an XML file which resides in the Metadata folder, which exists in every Folder that has been added to the Shareaza library. | ||
=== Context menu in Folder mode === | |||
[[Image:library_contextmenu_folder.png]] | [[Image:library_contextmenu_folder.png|right]] | ||
'''Explore''' opens the selected folder using the windows explorer. | '''Explore''' opens the selected folder using the windows explorer. | ||
| Line 57: | Line 59: | ||
'''File Properties''' Opens the [[Manual.FilePropertiesDialog|file properties dialog]] | '''File Properties''' Opens the [[Manual.FilePropertiesDialog|file properties dialog]] | ||
=== Context menu used on a single file === | |||
[[Image:library_contextmenu_file.png]] | [[Image:library_contextmenu_file.png|right]] | ||
'''Open or Play''' opens the selected file with the [[ | '''Open or Play''' opens the selected file with the [[Shareaza Media Player]] if it is a media file. '''Hold down the shift key to open the file with the system's default application'''. You can disable the Shareaza Media Player in the [[Options.MediaPlayer|Media settings]]. If the file is no media file, the file will be opened using its associated application anyway. | ||
'''Add to Playlist''' adds the selected file to the [[ | '''Add to Playlist''' adds the selected file to the [[Shareaza Media Player]] Playlist. | ||
'''Copy URI''' opens the Copy URI dialog, which allows you to copy the URI for the selected file. There are two types of URIs you can copy: [[ | '''Copy URI''' opens the Copy URI dialog, which allows you to copy the URI for the selected file. There are two types of URIs you can copy: [[Magnet link]]s and ed2k links. Magnet links are the preferred links on the G2 and gnutella network, however they can be used for every P2P network in theory. ed2k links do only work On the ed2k network, however many Gnutella applications do also support them more or less. | ||
'''Delete''' moves the file to the windows trash. | '''Delete''' moves the file to the windows trash. | ||
| Line 78: | Line 80: | ||
'''Properties''' Opens the [[Manual.FilePropertiesDialog|file properties dialog]] | '''Properties''' Opens the [[Manual.FilePropertiesDialog|file properties dialog]] | ||
=== Context menu used on multiple files === | |||
The main difference between selecting one file and selecting multiple files is that '''Copy URI''' will change to '''Export URIs''' which is a very powerful and customizeable way of exporting information about library files. | The main difference between selecting one file and selecting multiple files is that '''Copy URI''' will change to '''Export URIs''' which is a very powerful and customizeable way of exporting information about library files. | ||
== Export URIs == | |||
[[Image:export_uri_dialog2.png]] | [[Image:export_uri_dialog2.png|right]] | ||
This is a very powerful feature that allows one to get lots of different information about their files in a consistent format all at once that they can [[ | This is a very powerful feature that allows one to get lots of different information about their files in a consistent format all at once that they can [[Magnet link|copy in to a web page]] for instance to share with others. | ||
The text in the input box is what is used to create the exported text. Anything in brackets is called a token and will be replaced a piece of information about the specific file or other special information. Since most people probably want to do the exact same thing with their files Shareaza provides a list of presets to make things easier. | The text in the input box is what is used to create the exported text. Anything in brackets is called a token and will be replaced a piece of information about the specific file or other special information. Since most people probably want to do the exact same thing with their files Shareaza provides a list of presets to make things easier. | ||
| Line 91: | Line 93: | ||
* '''Magnet:''' Creates a list of plain Magnet URIs. | * '''Magnet:''' Creates a list of plain Magnet URIs. | ||
* '''eDonkey:''' Creates a list of URIs compatible with eDonkey. | * '''eDonkey:''' Creates a list of URIs compatible with eDonkey. | ||
* '''Magnet HTML:''' Creates a list of Magnet | * '''Magnet HTML:''' Creates a list of [[Magnet link]]s for putting on a webpage. | ||
* '''eDonkey HTML:''' Creates a list of eDonkey links for putting on a webpage. | * '''eDonkey HTML:''' Creates a list of eDonkey links for putting on a webpage. | ||
| Line 115: | Line 117: | ||
* '''Include yourself as a source in a magnet:''' To include yourself as a source in a magnet use the following template. Since you may have dynamic ip addresses, which change from time to time, in that case, it works best if you're going to use it straight away: ''<nowiki>magnet:?magnet:?xt=urn:bitprint:[SHA1].[TIGER]&xt=urn:ed2k:[ED2K]&xl=[ByteSize]&dn=[NameURI]&xs=http://[LocalHost]:[LocalPort]/uri-res/N2R?urn:bitprint:[SHA1].[TIGER]</nowiki>'' | * '''Include yourself as a source in a magnet:''' To include yourself as a source in a magnet use the following template. Since you may have dynamic ip addresses, which change from time to time, in that case, it works best if you're going to use it straight away: ''<nowiki>magnet:?magnet:?xt=urn:bitprint:[SHA1].[TIGER]&xt=urn:ed2k:[ED2K]&xl=[ByteSize]&dn=[NameURI]&xs=http://[LocalHost]:[LocalPort]/uri-res/N2R?urn:bitprint:[SHA1].[TIGER]</nowiki>'' | ||
* '''Thumbnail Image Gallery:''' This template takes advantage of Shareaza thumbnail preview feature to create a list of thumbnail images that can be clicked on to download the full image via a magnet. Your success may vary. Copy this code: ''<nowiki><a href="magnet:?xt=urn:bitprint:[SHA1].[TIGER]&dn=[NameURI]"><img src="http://[LocalHost]:[LocalPort]/gnutella/preview/v1?urn:sha1:[SHA1]" alt="[Name]"></a></nowiki>'' | * '''Thumbnail Image Gallery:''' This template takes advantage of Shareaza thumbnail preview feature to create a list of thumbnail images that can be clicked on to download the full image via a magnet. Your success may vary. Copy this code: ''<nowiki><a href="magnet:?xt=urn:bitprint:[SHA1].[TIGER]&dn=[NameURI]"><img src="http://[LocalHost]:[LocalPort]/gnutella/preview/v1?urn:sha1:[SHA1]" alt="[Name]"></a></nowiki>'' | ||
== See also == | |||
* [[Manual.ShortcutKeys]] | |||
{{Navigation|Manual}} | |||
Latest revision as of 22:57, 31 March 2010
|
|
[[::Library Manager|English]] • [[::Library Manager/de|Deutsch]] • [[::Library Manager/es|Español]] • [[::Library Manager/fr|Français]] • [[::Library Manager/he|עברית]] • [[::Library Manager/it|Italiano]] • [[::Library Manager/nl|Nederlands]] • [[::Library Manager/pl|Polski]] • [[::Library Manager/pt|Português]] • [[::Library Manager/ru|Русский]] • [[::Library Manager/zh-hant|中文(繁體)]] | e |
|
|
This page has been updated on 2009-04-01 for the release of Shareaza v2.5.2.1. | e |
The Shareaza Library Manager is one of the key features of Shareaza. It allows you to organize your library of downloaded and shared files.
Overview

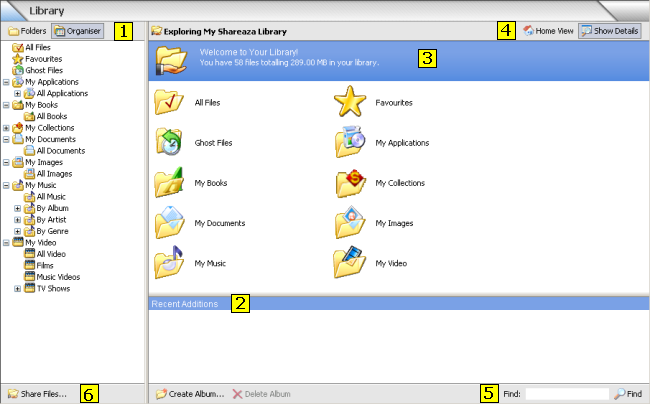
The Shareaza Library allows you to manage all your files from within Shareaza.
1. Mode switcher: The Shareaza Library has two file Browsing modes. Physical (Folders) and Virtual (Organiser). Physical or Folder mode shows your files and folders as they are stored on your harddrive. In Virtual or Organiser mode Shareaza organizes your files based on thier content. No matter where they are stored all your mp3 files will appear in the my Music folder There they are again put into separate folders for the corresponding album or artist or genre. Note that in the Virtual library, the same file may be placed in more than one virtual folder at a time.
2. Recent Additions: Shareaza keeps the files which have been recently downloaded in a Recent additions list. This list is shown here. If you click on one of the links the file will be selcted in your library. You can clear this list using the button on the Library Settings window.
3. Main display area: In this area you can see the folder content or the album tracks if you selected an album folder.
4. View changer: This button allows you to change the view mode. Available modes are:
- Detail view
- List view
- Icon View
- Thumbnail View
- Album View
5. Find files: This allows you to search your library for files. It uses the same mechanism for searching as a regular network search. This means that substring searches do only work if the word you are searching for is the word in the file minus the last one or two letters.
6. Share Files...: This button opens the Folder manager dialog which allows you to add or remove folders from your library. The folders in your library are not necessarily shared. They can be unshared using the context menu.

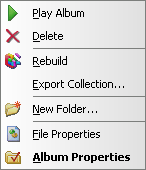
Play Album enqueues all files in the selted album folder in the Shareaza Media Player.
Delete removes the selected folder from the Library. This only removes the folder. The files are still there.
Rebuild makes Shareaza re-read the files' metadata and recalculate the hash values.
Export Collection... creates an XML file which can be used as a basis for a Shareaza collection file.
New Folder... creates a new album folder. This is not a fodler on your harddrive. It only exists in the Shareaza Library and allows you to better organize your files.
File Properties Opens the file properties dialog
Album Poperties Opens the album properties dialog which allows you to set the album type and apply metadata to all files in the selected folder. Applying metadata doesn't change the file. Metadata is stored in an XML file which resides in the Metadata folder, which exists in every Folder that has been added to the Shareaza library.

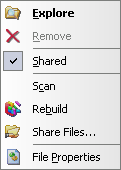
Explore opens the selected folder using the windows explorer.
Remove removes the selected folder from the Library. The Folder is not deleted.
Shared allows you to share / unshare folders. Unshared folders have a little lock symbol. ![]()
Scan makes Shareza scan the selcted folder for changed files.
Rebuild makes Shareaza re-read the files' metadata and recalculate the hash values.
Share Files opens the Folder manager dialog which allows you to add or remove folders from your library. The folders in your library are not necessarily shared. They can be unshared using the context menu.
File Properties Opens the file properties dialog

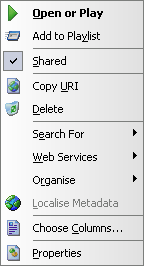
Open or Play opens the selected file with the Shareaza Media Player if it is a media file. Hold down the shift key to open the file with the system's default application. You can disable the Shareaza Media Player in the Media settings. If the file is no media file, the file will be opened using its associated application anyway.
Add to Playlist adds the selected file to the Shareaza Media Player Playlist.
Copy URI opens the Copy URI dialog, which allows you to copy the URI for the selected file. There are two types of URIs you can copy: Magnet links and ed2k links. Magnet links are the preferred links on the G2 and gnutella network, however they can be used for every P2P network in theory. ed2k links do only work On the ed2k network, however many Gnutella applications do also support them more or less.
Delete moves the file to the windows trash.
Search For allows you to search for excatly this file by Hash, for similar files by name or for files from the same album or artist.
Web Services allow you to use The Bitzi or Jigle services. If you choose one of these options Shareaza will transmit all the data it knows about the file and will take you to the selected service and show all the informationthey know about the file. Acquire metadata will try to get metadata for the file from Bitzi.
Organise allows you to move, rename or copy the file. If you are in Organise mode, you can also remove a file from the current album.
Choose Columns allows you to choose the columns to display, like Name, Size, bitrate etc.
Properties Opens the file properties dialog
The main difference between selecting one file and selecting multiple files is that Copy URI will change to Export URIs which is a very powerful and customizeable way of exporting information about library files.
Export URIs

This is a very powerful feature that allows one to get lots of different information about their files in a consistent format all at once that they can copy in to a web page for instance to share with others.
The text in the input box is what is used to create the exported text. Anything in brackets is called a token and will be replaced a piece of information about the specific file or other special information. Since most people probably want to do the exact same thing with their files Shareaza provides a list of presets to make things easier.
Presets
- Magnet: Creates a list of plain Magnet URIs.
- eDonkey: Creates a list of URIs compatible with eDonkey.
- Magnet HTML: Creates a list of Magnet links for putting on a webpage.
- eDonkey HTML: Creates a list of eDonkey links for putting on a webpage.
Tokens: If none of the templates suits you then tokens can be used to customize how the files will be exported. A token can be added in one of two ways. Either type in the token in brackets or choose it from the Insert Token drop down list.
- Tiger Root: Inserts the TigerTree hash (aka TTH) of the file. It can be typed as [TIGER].
- SHA1: Inserts the SHA1 hash. It can be typed as [SHA1].
- MD5: Inserts the MD5 hash. It can be typed as [MD5].
- ED2K (CMD4): Inserts the eDonkey hash. It can be typed as [ED2K].
- Filename: Inserts the full name of the file. It can be typed as [Name].
- Filename (URI): Inserts the full name of the file with special characters escaped. This should be used when it is going to be put on a web page. It can be typed as [NameURI].
- Base Filename: Inserts the name of the file without the extension. It can be typed as [FileBase].
- File Extension: Inserts the extension of the file. It can be typed as [FileExt].
- File Size: Inserts the size of the file in megabytes. It can be typed as [Size].
- File Size (bytes): Inserts the size of the file in bytes. It can be typed as [ByteSize].
- Folder Path: Inserts the full path to the file on your computer including the drive letter. It can be typed as [Path].
- Local Host: Inserts your IP address. This will probably only work if you explicitly set your IP in Settings -> Connection -> Inbound Address -> Address. It can be typed as [LocalHost].
- Local Port: Inserts the port number Shareaza is listening on. It can be typed as [LocalPort].
Custom Templates: Add your own custom templates here that you think other people will find useful.
- Basic Magnet with useful tags: Includes SHA1, TigerTree root hash, ed2k hash, file size in bytes, and file name. Included in an html encoded form for your convenience: <a href= "magnet:?xt=urn:sha1:[SHA1]&xt=urn:tree:tiger:[TIGER]&xl=[ByteSize]&xt=urn:ed2k:[ED2K]&dn=[NameURI]" >[Name]</a><br>
- Include yourself as a source in a magnet: To include yourself as a source in a magnet use the following template. Since you may have dynamic ip addresses, which change from time to time, in that case, it works best if you're going to use it straight away: magnet:?magnet:?xt=urn:bitprint:[SHA1].[TIGER]&xt=urn:ed2k:[ED2K]&xl=[ByteSize]&dn=[NameURI]&xs=http://[LocalHost]:[LocalPort]/uri-res/N2R?urn:bitprint:[SHA1].[TIGER]
- Thumbnail Image Gallery: This template takes advantage of Shareaza thumbnail preview feature to create a list of thumbnail images that can be clicked on to download the full image via a magnet. Your success may vary. Copy this code: <a href="magnet:?xt=urn:bitprint:[SHA1].[TIGER]&dn=[NameURI]"><img src="http://[LocalHost]:[LocalPort]/gnutella/preview/v1?urn:sha1:[SHA1]" alt="[Name]"></a>
See also
Navigation: ShareazaWiki > Manual > Library Manager