CollectionTemplate.HowTo: Difference between revisions
No edit summary |
No edit summary |
||
| Line 1: | Line 1: | ||
{{RecoveredPage|The following content has been recovered from the old wiki. This page may require additional formatting.}} | {{RecoveredPage|The following content has been recovered from the old wiki. This page may require additional formatting.}} | ||
= | = How to make a Collection template = | ||
'''''NOTE: these code samples are from different templates. this is <u>not</u> a working example template''''' | '''''NOTE: these code samples are from different templates. this is <u>not</u> a working example template''''' | ||
Revision as of 13:55, 10 March 2010
|
|
The following content has been recovered from the old wiki. This page may require additional formatting. | e |
How to make a Collection template
NOTE: these code samples are from different templates. this is not a working example template
There are 3 ways to make a template. The 2 simplest ways are to base it off of a collection you've already made or copy and rename an existing template folder. You can also create it from scratch but this is not recommended unless you know what you are doing
The Files
A template consists of a minimum of three files or as many as you like. They are all text files and can be edited with a program such as notepad. You can name them however you see fit, as long as they are properly linked together(.tpl extension is recommended). For the sake of simplicity we will only refer to 3 files in this tutorial.
collection.xml
This is the central file in your collection template. You can name it whatever you like but there can only be one of them, and it must have the ".xml" extension. This is the file that gives information about the template and gets information from the wizard.
[collection.xml]
<?xml version="1.0" encoding="UTF-8"?>
<template xmlns="http://www.shareaza.com/schemas/Template.xsd" version="1.0">

<!-- ALL OF THE FOLLOWING SECTIONS GO HERE -->

</template>
It consists of four sections
<manifest>
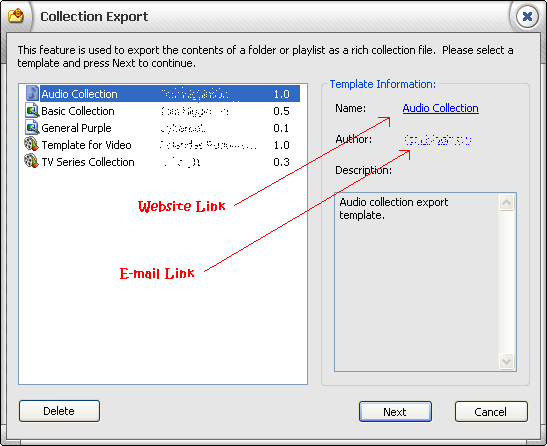
This is the information that will be displayed on the first screen of the wizard.
[collection.xml]
<manifest	name="My Collection"
			author="Your name"
			version="1.0"
			link="http://www.yoursite.com/"
			email="youremail@domain.com"
			description="What is this collection for?"
			icon="audio.ico"
/>
<files>
This is where you will link to the template(.tpl) files used in your collection. These do not include images, external javascript, or external CSS files. These files can be named whatever you like.
[collection.xml]
<files>
	<file type="main" path="collection.tpl"/>
	<file type="evenfile" path="collectionrow.tpl"/>
	<file type="oddfile" path="collectionrow.tpl"/>
</files>
If you like you can use the evenfile and oddfile types to reference 2 separate row files. This is useful if you want to have alternating row colors, different text, or different styles. They will alternate for each file.
<images>
If you are going to use any images on your page then they must be listed here so that they can be included in the collection when it is built.
[collection.xml]
<images>
	<image path="images\bar_on.gif"/>
	<image path="images\bar_off.gif"/>
	<image path="images\Screenshot_Part.png"/>
	<image path="images\Top.png"/>
	<image path="images\res.gif"/>
	<image path="images\bg.jpg"/>
</images>
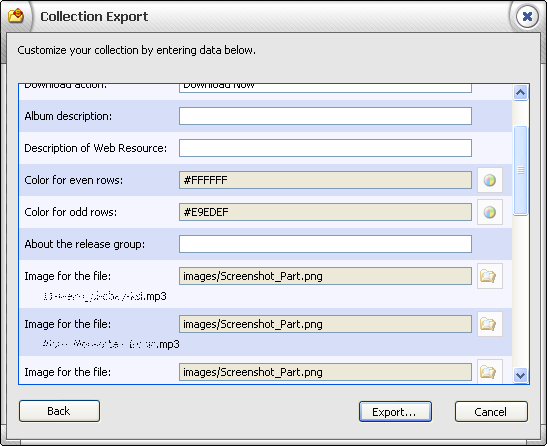
<wizardText>
This is the part that will show up on the customize page of the wizard. You can add as many or as few languages as you feel is necessary. It is best to put the english translation at the end so the wizard will exit data collection immediately when language specific data already loaded
[collection.xml]
<wizardText>
<text language="lt">
		<item id="1" type="textbox" value="Atveriant byla" default="Atverti byla"/>
		<item id="2" type="textbox" value="Bylai siunciantis" default="Siunciama"/>
		<item id="3" type="textbox" value="Atsisiuntimo veiksmas" default="Atsisiusti dabar"/>
		<item id="4" type="textbox" value="Rinkinio aprašymas"/>
		<item id="5" type="textbox" value="Web resurso aprašymas"/>
		<item id="6" type="colorpicker" value="Nelyginiu eiluciu spalva" default="#FFFFFF"/>
		<item id="7" type="colorpicker" value="Lyginiu eiluciu spalva" default="#E9EDEF"/>
		<item id="8" type="textbox" value="Apie leideju grupe"/>
		<item id="9" type="multi-filepicker" value="Paveikslelis" default="Part.png"/>
	</text>
	<text language="en">
		<item id="1" type="textbox" value="File opening action" default="Open File"/>
		<item id="2" type="textbox" value="While downloading" default="Downloading"/>
		<item id="3" type="textbox" value="Download action" default="Download Now"/>
		<item id="4" type="textbox" value="Album description"/>
		<item id="5" type="textbox" value="Description of Web Resource"/>
		<item id="6" type="colorpicker" value="Color for even rows" default="#FFFFFF"/>
		<item id="7" type="colorpicker" value="Color for odd rows" default="#E9EDEF"/>
		<item id="8" type="textbox" value="About the release group"/>
		<item id="9" type="multi-filepicker" value="Image for the file" default="Part.png"/>
	</text>
</wizardText>
This is where you start to make each collection unique! You can add as many items as you need, but be sure to give them each a unique id. This does not have to be a number but it is recommended. You can choose from three item types: textbox, colorpicker, and multi-filepicker. Textbox and colorpicker will show up once only, but multi-filepicker is a file browser that will show up for every file. This can be used to display a different image, or file path, for each file in the collection

collection.tpl
This is your html minus the file entries. this can contain any of the variables that you've added in your collection.xml file, javascript, and CSS. simply replace where the the files entries would go with $data$
[collection.tpl]
<html>
<head>
  <meta content="text/html; charset=UTF-8" http-equiv="content-type">
  <title>Shareaza collection example</title>
</head>
<body>
<span style="font-weight: bold;">Shareaza Collection<br>
	<br>
	Downloaders: Click the links below to download these files using Shareaza.<br>
	<br>
	Collection creators: A .collection can be edited just like a webpage - this .htm
        file is just something to get you started. Be creative and have fun!<br>
	<br>
<!-- THE FILES WILL GO HERE -->
	$data$
</span>
created by: $8$
</body>
</html>
collectionrow.tpl
This is the section that will be printed once for every file in your collection. If even and odd files are used you will need to create two of these - one for even and one for odd files. In order to make each record unique there are some special tags that you can add to get information about the file. Depending on how much information you want to display, this can get very complicated.
Some of the variable available include:
$meta:number$ - the number of the file being printed-a sequential number starting at 1, increases by one for each new file. this can be used for an array or just to make a list (1,2,3,4)
$meta:episodenumber$ - the episode number as listed in the file's metadata (if none is listed it will be "N/A")
$meta:bitprint$ - the bitprint of the file( [sha1].[TTH] ). this can be used for a download link when used in a magnet
$meta:ed2khash$ - the ed2k hash of the file
$meta:md5$ - the md5 hash of the file
$meta:title$ - the title as listed in the file's metadata
$meta:description$ - the description as listed in the file's metadata
$meta:size$ - the filesize(in bytes,kb, MB, GB, etc)
$meta:minutes$ - the duration in minutes
$meta:seconds$ - the duration minus the minutes (for use with $meta:minutes$)
$meta:name$ - the filename with extension
$meta:height$ and $meta:width$ - the height and width of an element as listed in the file's metadata
$meta:codec$ - the codec used in a video file
You can combine these to make magnet/download links for each file. eg. <a href="javascript:doDownload('urn:bitprint:$meta:bitprint$');">$meta:title$ ($meta:name$)</a>
[collectionrow.tpl]
<tr bgcolor="$6$">
        <td width="173" align="center" valign="middle">
        <img src="$9$" width="173" height="88" border="10" /></td>
        <td width="100%" align="left" valign="top"><span class="style5">PART $meta:number$: $meta:title$</span>
        <br />
        <span class="style6">$meta:description$
        <br />
        <br />
        </span><span class="style1"><strong>
        writeFile( "urn:bitprint:$meta:bitprint$" );
        </strong>($meta:size$) <strong>/</strong> Time: $meta:minutes$ Minutes, $meta:seconds$ Seconds</span>
        </td>
</tr>
See also
You may also want to check out the Collections How-to
