FAQ.FirewallsRouters.BlackICEPCProtection
|
|
[[::FAQ.FirewallsRouters.BlackICEPCProtection|English]] • [[::FAQ.FirewallsRouters.BlackICEPCProtection/de|Deutsch]] • [[::FAQ.FirewallsRouters.BlackICEPCProtection/es|Español]] • [[::FAQ.FirewallsRouters.BlackICEPCProtection/fr|Français]] • [[::FAQ.FirewallsRouters.BlackICEPCProtection/he|עברית]] • [[::FAQ.FirewallsRouters.BlackICEPCProtection/it|Italiano]] • [[::FAQ.FirewallsRouters.BlackICEPCProtection/nl|Nederlands]] • [[::FAQ.FirewallsRouters.BlackICEPCProtection/pl|Polski]] • [[::FAQ.FirewallsRouters.BlackICEPCProtection/pt|Português]] • [[::FAQ.FirewallsRouters.BlackICEPCProtection/ru|Русский]] • [[::FAQ.FirewallsRouters.BlackICEPCProtection/zh-hant|中文(繁體)]] | e |
- Go to your programs directory
- ISS
- BlackICE PC Protection
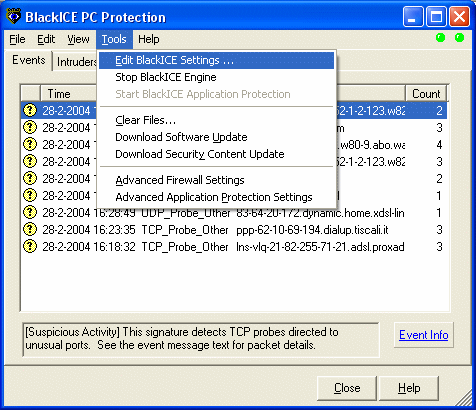
- This should be your first view and view to see your what has been logged.
- The next step is to set up your automatic level of protection.
- Select Tools
- Select Edit BlackICE Settings
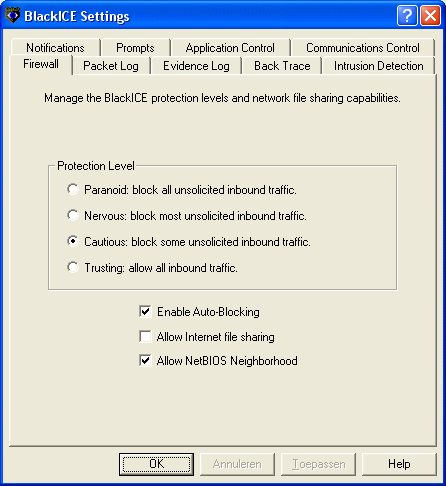
You can set up your firewall with many different automatic settings. It is up to your choice.
- Cautious is the minimal setting and works well not to automatically block too much access.
- Nervous blocks more.
- Paranoid blocks everything till you set it up to allow anything.
- Click Okay to save the settings
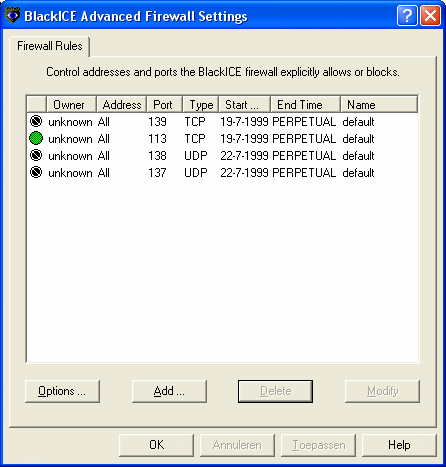
This is the your first view into what has been set for you. (This view will be different depending on what level of protection you have originally selected and what version of BlackICE you are using as the more up to date versions have some of these rules already to protect you from the Slammer worm and other worms. )
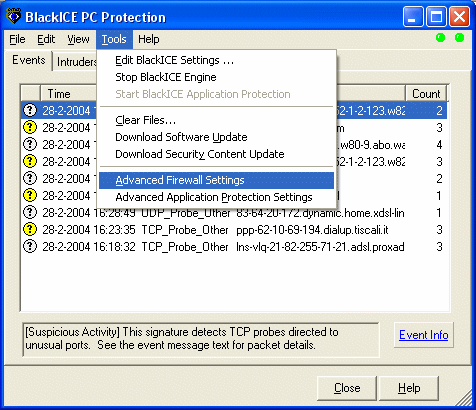
- Select Tools and Advanced Firewall Settings.
Setting BlackICE PC Protection to allow TCP and UDP traffic through the firewall on a specific port
- Click on Add:
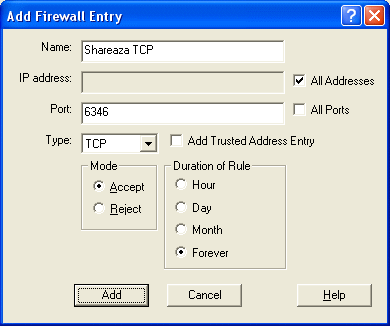
Now you need to add in the ports which Shareaza will be utilizing: Allow TCP traffic on port 6346 Settings first:
- First type in a name (Shareaza TCP)
- Check the All address box
- Type in Port 6346 (if this is what port you want Shareaza to use, For port forwarding default Shareaza selects this port)
- In the mode: Select Allow
- Duration of Rule: Select Forever
- Click on Add.
(See graphic below for an example)
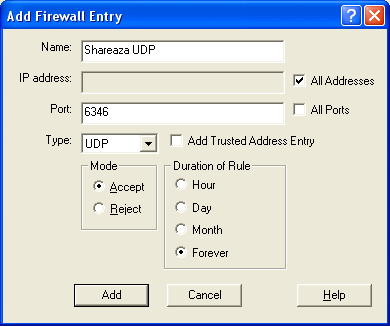
Then UDP traffic on port 6346 Settings:
- First type in a name (Shareaza UDP)
- Check the All address box
- Type in Port 6346 (if this is what port you want Shareaza to use, For port forwarding default Shareaza selects this port)
- In the mode: Select Allow
- Duration of Rule: Select Forever
- Click on Add.
(See below graphic for an example)
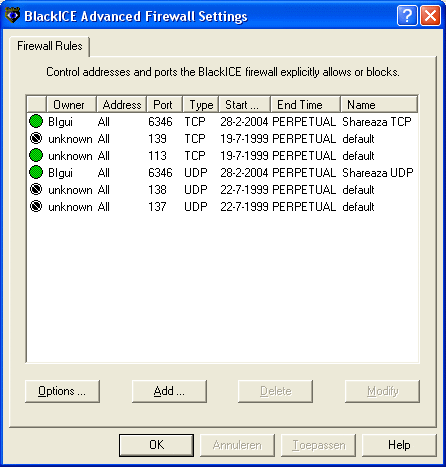
Now your entries have been added in to your firewall and you can always edit the entries by clicking on the modify box.
If Shareaza does not connect properly still (check your port numbers, as you may have typed them in incorrectly, Read them carefully, sometimes you may have switched around numbers or mistyped.)
 Click Okay to save and you're done!
For your reference:
- The Green circle stands for allow traffic.
- The Black circle with a slash (Do not enter) is for blocking traffic.
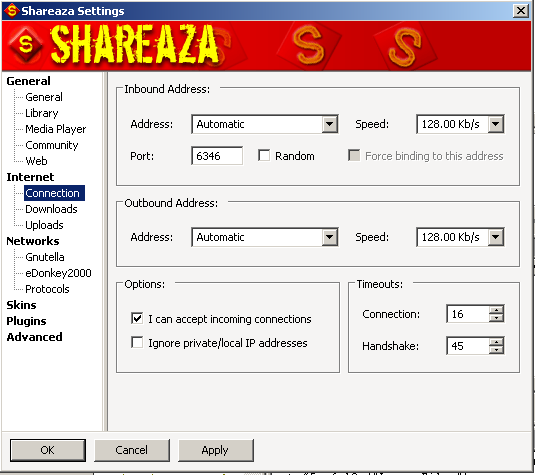
One final configuration: Go to Shareaza settings and under the Connections, check the box which says "I can accept incomming connections"
